Introduction
This is Part 2 of my practical guide to using Git and GitHub. This part covers some topics related to collaborating with others. If you are completely new to Git and GitHub, I would recommend reading the previous part: Learning Git, Part 1
Recap
Last part, we described a simple workflow you can do on your cloned project:
→ git add <new_file>
→ git commit -m "..."
→ git push
These commands add your changes to a staging area, commits them, and then pushes your changes up to origin, which is stored in the cloud.
This works well when you’re working on your own project, but what about when you are collaborating on a project with others? How do we merge their changes in?
Below, I will go over three scenarios you might encounter when pulling in changes, what their differences are, and how to properly fix them:
-
No Changes: Git Pull
-
With Uncommitted Changes: Git Stash + Git Pull
-
With Committed Changes: Git Fetch + Git Rebase
Git Pull
Assuming you haven’t made any changes to the repository, all you need to do is run:
$ git pull
Git Stash + Pull
If we have already made some changes, but haven’t committed them yet, you might get a merge conflict. Sometimes Git will try to resolve these merge conflicts for you, but other times the pull will fail. In this case, you can simply execute the following commands instead:
$ git stash
$ git pull
$ git stash pop
Stashing is a process that temporarily hides all of your visible changes. This is really useful for when you want to temporarily hide all of your local changes, but still want to bring them back easily. The first line hides all of your changes so that the pull will succeed. The last line un-stashes your changes.
When you run git pull, you will now see that the pull will have succeeded, however you may be left with some merge conflicts. If you are using a good IDE, hopefully it will give you an easy way to resolve these conflicts. I personally recommend VS Code, but there are many other good ones (Atom is also a good option).
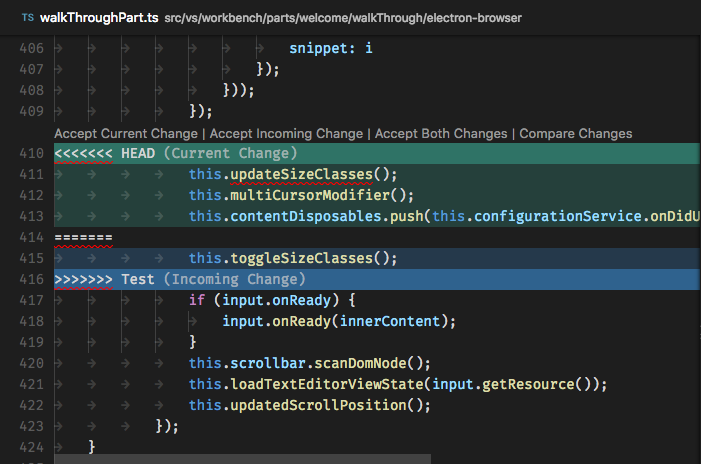
The two buttons on the top, “Accept Current Change” and “Accept Incoming Change” allow you to pick which version of that line you want.
Git Fetch + Rebase
If you have already made some changes and made one or more commits, stashing won’t work. This is because git stash only hides uncommitted changes. A common way to resolve this is by adding a merge commit resolving all changes, however merging doesn’t always lead to the best results (I talk about this more in Part 3).
We can perform a rebase instead! Rebasing is useful because we don’t want to create a merge commit that breaks our commit history, which makes it hard to go back and fix things later.
Instead, we want to retrieve all of the changes that have already been pushed to GitHub, and replay our commits on top of those.
 Merging vs Rebasing
To perform our rebase, we need to retrieve the other person’s changes from GitHub, but not merge them in yet. To do this, we use git fetch instead of git pull:
$ git fetch
$ git rebase -i origin/main
Rebasing will open a window in your terminal that looks something like the below image. This screen is asking us which commits we want to rebase with (the top four lines of the screen are our commits). Simply exit the editor to confirm the rebase (:x on Vim).
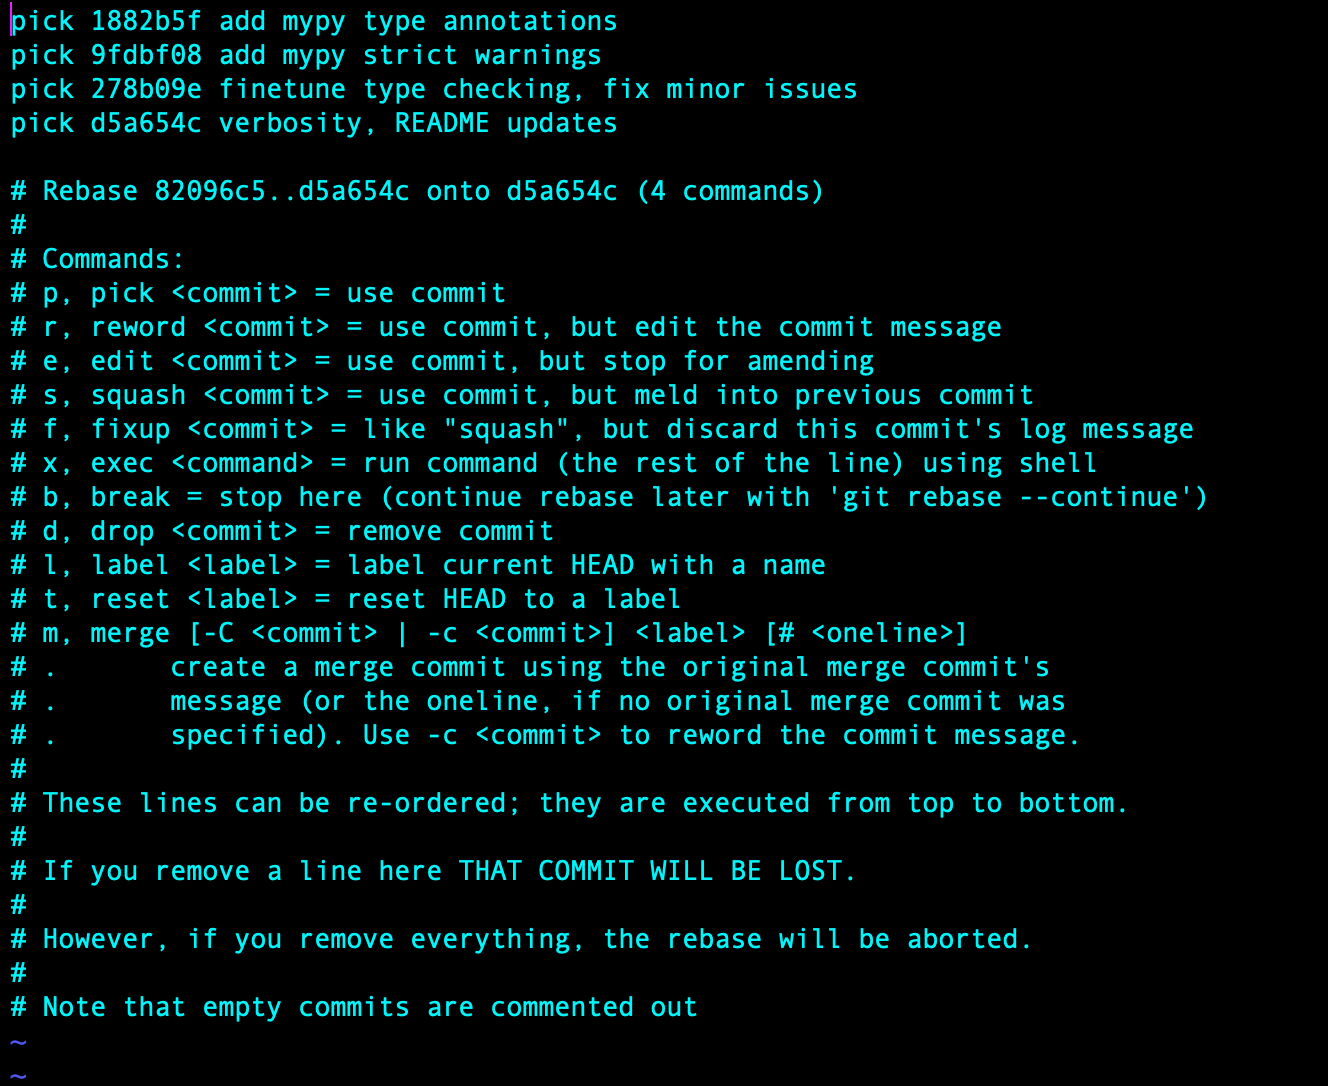 Rebase Confirmation Window
At this point, git will begin adding your commits, one at a time, on top of the current status of the GitHub repository. For each commit, if there are conflicts, we simply fix them in VS Code, and then run:
$ git rebase --continue
Once you finish fixing all of the merge conflicts, we’re done! We’ve successfully merged in all new changes.
Summary
If you are working on a project with a team, Git provides an easy way to commit and merge changes from a remote repository with the working, in-progress version of your work. To pull in changes, first think about what you’ve added since the last pull using git status. Then, choose one of the options of pulling in changes we discussed above.
If you like this workflow, you might consider automatically rebasing whenever you run git pull, using this command:
$ git config --global pull.rebase true
In the next part, we’ll explore features of Git that make collaboration easy, such as branching, as well as ways to undo your mistakes through reverting.